Categories
Eco Tips Green Building Recycling

Five Fun Ways To Introduce Recycling To Kids

So you’ve come a long way into educating yourself about recycling. Suddenly, you get the feeling that it is time to discuss this topic with your children. Recycling is a matter of raising awareness about the impact we have on the world we inhabit. If our goal is to create sustainable change, then change has to be transmitted to next generations. Thankfully for us, kids are more than willing to learn about planet earth and how to take care of it. So it is just a matter of finding the right approach. Let’s discuss some ideas.

Arrange a Field Trip
Even though it may require a little planning, a field trip to a recycling facility is a great way for kids to become acquaintance with the whole idea.  Besides, meeting professionals and workers at a recycle center will certainly boost their interest in the topic. Remember that kids of all ages are interested on seeing and experiencing things for themselves, so a “hands-on” experience will always work wonders with them.

Start your own recycling project with them
Another great “hands-on” experience for the children is to start a recycling project at home. So why not taking a weekend off to spend some quality time doing something incredibly gratifying like recycling paper with them. There are plenty of tutorials over the internet to draw ideas from. I assure you that kids will love the idea of creating something new out of old waste paper.

lighbulb-green-eco-thinking-guy-pic

Invent recycling games
Set up some games to educate your kids on recycling issues. Get creative and remember to focus on the experience. Allow them to be the recycling experts for a day or turn them into the ultimate recycling superheroes. Some ideas for you to experience with are to create games related to sorting garbage items, making organic composts and dumping the right kind of waste on the right kind of bin. And always give away prizes, and treats!

Discuss with your children on how waste affects nature
Be honest with them about the current environmental situation. Talk to them about the changes our planet is going through and our responsibility as humans in reverting this process. Educate them about contamination and how human waste has a profound effect on planet earth. Help them realize how recycling can lead to positive environmental changes.

Empower them
Information is power. Education is power. Awareness is power. Do not underestimate your children’s potential to become change agents. Empower them to take active part in every possible way they can. They’ll be more than willing to do so.

Recycling can be fun and games but it can also be a powerful transformation tool in our homes, our schools and communities. Don’t be afraid to raise awareness. As Gandhi once said: “Be the change you want to see in the world”. Encourage your kids to live under the same principle and keep change going!

Categories
Eco Tips Green Building Home Decor Home Design Home Improvement

10 Mistakes: You Are Building That Green Home Wrong

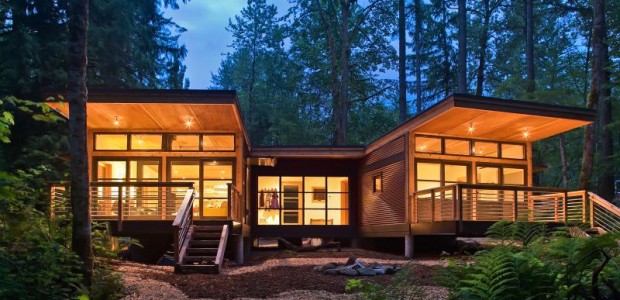
green-building-mistakes-ruining-existing-ecosystemsSo you want to build a green home? Do not look at me. I am not going to help build it. I will give you some mistakes to avoid when building a green home of your own, but that is it. If you want to reduce your carbon footprint and be environmentally conscious then make sure you know everything you need to know about eco-friendly building.

It is not as easy as it seems.

Avoiding these mistakes will help your green home building process go faster and easier.

Mistake 1: When you plan out your green home, do not make it big like a palace. Keep in mind your lifestyle. The bigger the house, the more it will cost in electricity, heating, and not to mention the unused space.

Mistake 2: Straying off the beaten path is bad. Why? If you build in a new area away from town, and deep in the countryside, then you will ruin an established ecosystem. Know your lot and location before you break ground.

Mistake 3: Not thinking ahead of time can be damaging. Will you be living in your home 20 years from now? To be honest, I would not even know if I were. Knowing how long you plan on staying in your new green home can help with budget and space issues.

Mistake 4: Not doing research on green building can be bad in the long run. Yes those wooden floors are made from recycled wood but are they great with the moisture environment you live in? Knowing what building materials to use for your new home’s location is priceless. Plus, if you get contractors, they cannot screw you on the price because you know what you are talking about.

Mistake 5: Filling your home up with non-eco-friendly appliances is a no-no. Just think before you sink.

Mistake 6: Missing out on the sun’s energy is so wrong. Take advantage of the sun and use solar paneling. Make sure the roof is facing south; actually, your whole house should be facing south. You save lots of energy.

Mistake 7: Listening to your friend who knows nothing about green building, will not help you. Ask for help from a knowledgeable source.

Mistake 8: Insufficient insolation will empty your pockets in a quick minute. Insulate well and keep the cold out. If you do it right, then you will be living cozy and nice. Plus your electric bill will be very low.

Mistake 9: Going flat on the roof design is bad for a green build. Slant the roof to allow drainage. Make sure it too is insulated well. You can also make the drainage pipe connect to the garden to use the water.

Mistake 10: Forgetting to plant the actual green is often overlooked. Plants are very beneficial to green building. Do not plant random trees, bushes, and flowers. Do some research and plant what will thrive in your environment.

Do not follow these mistakes but learn from them. In no time you will have your own green home.

Categories
Green Building Home Design

Better Than My Own House: Out-Of-This-World Birdhouses

Treehouses are becoming more than just slabs of wood nailed together on top of a high tree. Oh yeah, people are getting creative with their treehouses. Some include an actual working elevator lift! if that’s not enough for you, they may also include solar power panels, and running water. That sounds better than my own house!

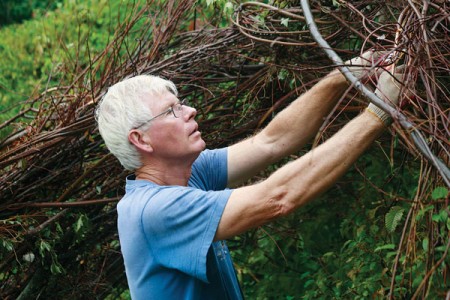
Treehouses nowadays are being made by using the actual tree. Other treehouses are being deemed works of art. They are so big that they seem to be made by a humongous bird. In reality they are just made by a human like you and I, but one that is extremely creative. If I were a bird I would want to live in one of his special nest houses.

Patrick-Dougherty-tree-sculpting-weaving-design
http://goo.gl/Rl1ICR

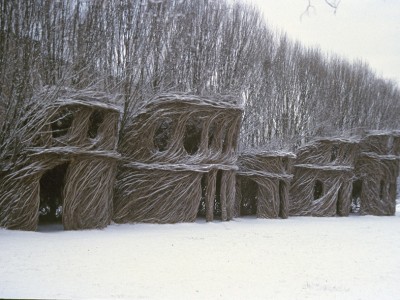
The amazing artsy human who created this is known as Patrick Dougherty from North Carolina. His nest houses are so wonderful and unique that he is known as a branch-bender extraordinaire/artist. He basically sculpts growing trees into shapes that form a house, a bird nest, a cocoon, a clay pot, etc. The weaving ideas are endless. He has a background in sculpting and a love for nature so it comes to good use in his field of work. He is a winner of many awards and his living art has traveled through the whole United States, Japan, Brussels, and many more locations worldwide. I find it tough to bend one single tree branch; how he does it, I will always marvel over his strength. We normal folks call it art work, but Patrick calls his amazing sculpted work ‘stickwork’. I say tomato, you say tomatoe. You’re unbelievable, Patrick! Your work should be called “magic”.

With over 200 sculpted pieces of work, Patrick decided to showcase them all for you in his published book, Stickwork. My favorite piece of his is called Just Around the Corner in New Harmony, Indiana. It looks like something out of the Lord of the Rings realm. Each branch is bent to perfection.

Just-Around-Winter-Patrick-Doughert-design
http://www.stickwork.net/featured/

Not everyone can be Patrick, but you can be you. Learn to create your own nest house, treehouse, inside decoration, birdhouse or backyard sculpture. It just takes a little bending of your creativity. I recommend doing some research first on what type of wood works best for the type of project you want to do. There are three types: Dogwood, Live Oak, and Elm. These are used in the craft of pleaching: molding and weaving trees to create structures. You can also just create a tree house of your choice, and weave wood around it. It will take time because trees do not grow real fast. The outcome will be spectacular, though and of course, you should use branches that are already on the floor.

Three tips on how to begin.

      1. Plan out the tree house. Make a sketch. Doodle away! Get creative and don’t be afraid.
      2. See if it is safe to build on your specific tree. Get a tree expert to come out and check if you’re planning something on a large scale.
      3. Measure twice, cut once. Do not waste wood. Recycle as much as possible.

The great thing about building a treehouse for your kids is that the measurements can be adjusted. Want an adult treehouse? Make the measurements bigger. Want a birdhouse? then make the measurements smaller, like real small. Nope, smaller than that. Smaller. There you go.

Nest houses, sculptures, huts, giant bird houses, and unthinkable tree houses are all possible. Get inspiration from Patrick Dougherty. Get inspiration from the Ewok village in Star Wars. Be creative and weave something good.

Categories
Green Building Home Design

Welcome To My Pallet House

Welcome To My Pallet House

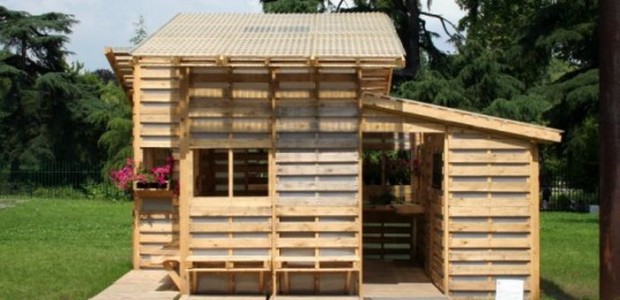
As a child I always wanted a tree house, but ever since I saw Fern Gully, the movie, I did not want to hurt the rainforest. As an adult, I can now build my own tree house using reusable pallets. Thanks to two students from the University of Vienna who designed the Paletten Haus, I am able to make my childhood dream come true.

Want to make your own too? Go to a Home Depot and you’re bound to find wooden pallets being used to rest heavy objects or merchandise on top of them. But you will more than likely find a bunch of them next to an industrial trash bin outside of your local warehouse or supermarket. A lot of these stores receive these pallets during shipping of a large crate full of items. So they’ll actually be more than willing to simply give them to you for free if you ask for them. I actually got 4 different stores to hand them over to me for free, and none of them refused. This means that you’ll be able to build a house, an extra room, a shed, or even a cabin out of this stuff without having to spend so much on material.

You can go online and find blueprints on how to build one of these eco-friendly shelters just like that. It’s so easy in fact, that you can probably build a simple small shelter using about a hundred of these pallets. With the right power tools, nails and of course, help from your friends and family, you’ll have a 250 square foot home in a week or two. The stacking of these wooden pallets is fairly easy when making up the house. Just make sure that you make it so that the roof is slanted. This way, debris, snow, and water will slide down rather than getting stuck on top of your home.

So why go for these wooden pallets to make a modular style home as opposed to buying conventional material like plywood? Well for one thing, they are a whole lot cheaper than other types of wood, metal or other materials. You can even build a chicken coop, or tiny play house for less than $25 dollars. Click here to see a cool video on how to build a chicken coop.

Another great advantage is the fact that these bad boys are strong and durable. After all, they have to be if they’re able to hold heavy loads of items at hardware, department store and supermarkets. You certainly wouldn’t expect a company to use something flimsy to hold up merchandise that can tip over and crush a customer. With that same logic, you wouldn’t want to build a house that could be blown away by the wind or that your 2 year old daughter could bring down by leaning on it. With some common sense, you can stack up and nail these wooden pallets so that they create a bulky and sturdy house.

Now if there’s one thing you can say about wooden pallets is that they are easy to find. You don’t have to risk going to the hardware store and finding out that there isn’t enough material because there are as many wooden pallets out there as there are ants running around the planet. In the extremely rare event that a hardware store does not have any, you can scavenge the back of malls and shopping centers until you find enough pallets.

Learn about building one on your own here: DIY Pallet House. Sometimes you may find a pallet that has been damaged or one of the planks has come loose. Don’t worry. They are easy to fix. It’s just a matter of hammering a couple of nails and the pallet will be as good as new. Creating a home out of shipping pallets is not only an affordable way to build but it saves a lot of time, manpower, and is eco-friendly.

Categories
Green Building Recycling Uncategorized

How To Make S’Mores And Memories With Your Old Washer And Dryer

Is it time to replace your old, beat-up washer and dryer? Don’t drag them to the curb just yet. All it takes is a little creativity and elbow grease to transform them into something entirely different from their intended use. In fact, that old, beat-up washing machine and the dryer that no longer gets hot will soon become the focus of your next backyard get together. With these easy instructions, you can transform the washer to a fire pit and the dryer to a beverage cooler.

From Washing Clothes to Making S’mores

Have you have dreamed of sitting around a backyard fire pit, roasting marshmallows, eating S’mores and making family memories? Good news, the metal drum of your old washing machine can make that dream come true. Follow these four simple steps and you can start making memories this weekend.

  • Remove the metal drum from the washing machine.
  • Remove any rubber or plastic pieces attached to the drum.
  • Using a wire brush and warm soapy water, scrub off all the soap scum and rust.
  • Paint the drum with a high heat-resistant spray paint, such as Rustoleum.

The fire pit can be used as a portable unit or installed in a decorative stone surround. To make the fire pit portable, simply bolt three metal casters to the bottom of the tub. For a more decorative, permanently placed pit:

  • Clear an area in the yard that measures about 3 feet by 3 feet.
  • Place the tub in the center of the cleared space and place decorative stone about 2-inches deep around the tub.
  • To contain the stones, sink bricks in the ground to create a perimeter around the fire pit area.

 From Dryer to Beverage Cooler

The only thing more perfect than a backyard fire pit is sipping on a cold beverage while you’re roasting marshmallows. The basket of the dryer is the ideal size for a beverage cooler and the holes allow the water from the ice to drain. Simply remove the basket from the dryer, clean with warm soapy water, fill with ice and your favorite beverage.

What to do With Leftover Parts-
Once you have removed the tub from the washer and the dryer, separate the remaining parts. Take the metal housing from both appliances to a metal recycling plant where you can sell it for scrap metal. Appliance repair shops often need difficult to find parts for older machines, which means you could sell your extra parts to them. Check with your county about how to correctly dispose of any left over wiring and other unusable parts from your old appliances.

Want to turn your fire pit into a grill? Visit your local appliance repair shop to search for inexpensive metal grates from old ovens or refrigerators. Clean the grate and place it over the fire pit and you instantly have a unique, one-of-a-kind grill.

~Rene W.

Categories
Featured Green Building Home Design

3 Green Insulations You Should Consider When Remodeling

When thinking about remodeling a great way to reduce your carbon footprint is by choosing green insulation.  By choosing the correct insulation you can also reduce your energy cost.  You don’t have to choose the traditional fiberglass insulation; there are many different environmentally friendly choices.

Here are the top 3 green insulation options:

Sheep’s Wool

When wool fibers are compressed, they form millions of tiny air pockets. These pockets trap air, which keeps the animals — and homes — warm in the winter and cool in the summer. Plus, wool is very breathable, which means it can absorb moisture from the air without affecting its capacity to retain heat. Specifically, the outer layer of wool fiber is resistant to water. However, the fiber’s inner layer loves water and can absorb about one-third of its weight in moisture without ever feeling damp. And when wool becomes moist, it generates heat, which in turn prevents condensation. If you insulate your home with wool, you don’t need to adjust your heating or cooling systems as often as you would with other materials and that saves money. Wool insulation keeps buildings cool in the day and warm at night, and it’s more fire resistant than other types of insulation.

Cotton

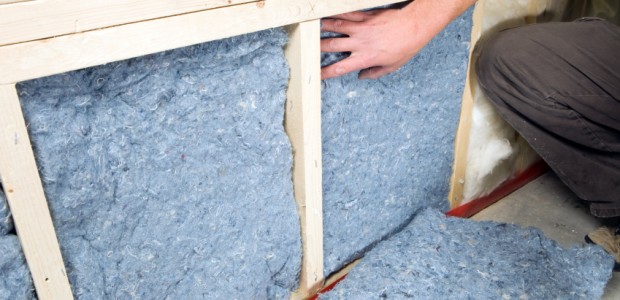
Cotton is a natural and renewable resource, which makes the plant one of the greenest insulation products on the planet. Cotton insulation is similar to fiberglass insulation in several ways. For one thing, it can be rolled into batts. Cotton insulation doesn’t contain formaldehyde which has been linked to some types of cancer.  Cotton is very good at absorbing moisture, and when treated with boric acid, becomes flame retardant. However, one of the drawbacks of cotton insulation is that it costs about twice as much as fiberglass.

Icynene

Perhaps no home insulation seals your house as completely and as thoroughly as the spray-on foam insulation known as Icynene, which is made from castor oil. Once it hits the surface, Icynene expands nearly 100 times it volume. The puffy sponge cake-like substance creates a thick blanket of insulation that tightly seals air leaks. Not only does Icynene stop drafts, it also muffles noise. Icynene can reduce a home’s energy bill by 30 to 50 percent. Icynene works so well because it traps air in tiny bubbles during the foaming process. As the foam cures, the air remains in place. However a drawback of Icynene is that it’s expensive — about three times the cost of fiberglass.

Categories
Eco Tips Featured Green Building Home Design Home Improvement

Save Money This Winter With New Windows

Do you have old creaky windows or your winter energy bill outrageously high? Have you recently been considering remodeling your house and replacing your old windows with new energy efficient windows? There are many benefits to replacing your old windows.

How windows lose and gain heat. Windows lose and gain heat by conduction, convection, radiation and air leakage. This heat transfer is expressed with U-values, or U-factors (U-values are the mathematical inverse of R-values. So an R-value of 2 equals a U-value of 1/2, or 0.5). Unlike R-values, lower U-value indicates higher insulating value. Conduction is the movement of heat through a solid material. Radiant transfer is the movement of heat as long-wave heat energy from a warmer body to a cooler body. Air leakage siphons about half of an average home’s heating and cooling energy to the outdoors due to poor weather-stripping or single paned glass windows. For more information on ways windows lose and gain heat check out this website.

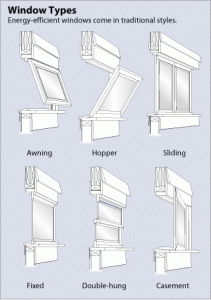
Different Types of Energy Efficient Windows.  Make sure to check for the Energy Star rating seal when looking to purchase new windows. Here are the different types of windows you can purchase.Energy Efficient Windows

  • Awning. Hinged at the top and open outward. Because the sash closes by pressing against the frame, they generally have lower air leakage rates than sliding windows.
  • Casement. Hinged at the sides. Like awning windows, they generally have lower air leakage rates than sliding windows because the sash closes by pressing against the frame.
  • Fixed. Fixed panes that don’t open. When installed properly they’re airtight, but are not suitable in places where window ventilation is desired.
  • Hopper. Hinged at the bottom and open inward. Like both awning and casement, they generally have lower air leakage rates because the sash closes by pressing against the frame.
  • Single- and double-hung. Both sashes slide vertically in a double-hung window. Only the bottom sash slides upward in a single-hung window. These sliding windows generally have higher air leakage rates than projecting or hinged windows.
  • Single- and double-sliding. Both sashes slide horizontally in a double-sliding window. Only one sash slides in a single-sliding window. Like single- and double-hung windows, they generally have higher air leakage rates than projecting or hinged windows.

Energy and Cost Savings. Windows have typically represented a major source of unwanted heat loss and unwanted heat gain, but there has been a major technological revolution. According to National Geographic, “Energy Star estimates that homeowners can save at least $27 a year by replacing windows. If you have single-pane windows, replacing them with Energy Star-qualified products will save you between $126 and $465 a year, depending on the number of windows you replace and where in the United States you live. The cost savings of replacing double-paned windows, however, is less than 25 percent of that amount; the most you can save by replacing double-paned windows is $111 per year”.

Sources: Green Living,  Efficient WindowsEnergy.gov

Categories
Articles Gadgets & Gear Green Building Home Design Home Improvement

Energy Saving Appliances

It seems that every company on the market claims to have energy efficient products that can lower your bills. How many times have you been walking through the store and you see the claims of “lowering your heating bill” or “eco-friendly dishwasher”? Just because an appliance company might claim to be “energy efficient” that does not mean it is necessarily true.

Every appliance is different and every appliance has a different rating scale. The good news is that the United States Department of Energy and the United States Environmental Protection agency have started working with Energy Star to label products when they are energy efficient thus protecting you from .

The Energy Star label states that the products either exceed federal energy consumption standards (normally by at least 15 percent or more) or they have energy saving features built into them. All products that have the Energy Star label are energy efficient products made to save you money and save the environment.

All products have different types of ratings and rates. When shopping for a new energy efficient product make sure you check the labels for the corresponding rating.

Central Air Conditioner:  SEER (Seasonal Energy Efficiency Rating) is the measure that is used to rate efficiency. The higher the number the more energy efficient the unit is try and look for a unit with a SEER of 12 or more.

Washing Machine:  EF (Energy Factor) indicates the number of complete cycles a washer will operate while using one kilowatt-hour of electricity. The current federal standard for energy efficient washers is an EF of 1.18, while Energy Star washers require an EF of 2.5.

Dishwashers:  EF (Energy Factor) indicates the number of complete cycles a dishwasher will complete while using one-kilowatt hour of electricity. Dishwashers that qualify for the Energy Star label have an EF of 0.52 or greater.

Refrigerators and Freezers:  The labels indicate the number of kilowatt-hours of electricity the appliance will use in one year of operation. The smaller the number, the more efficient the appliance and lower your bills.

In addition to saving you money every month, buying certified Energy Star appliances can also give you a tax credit at the end of the year. To find out if your new appliances make the cut check out Energystar.gov here for a complete list and details and to see if you qualify. Buying energy efficient appliances will help reduce your carbon footprint and will also lower your water bill and electric bill.

Source: housewares.about.com


Categories
Featured Green Building Home Improvement

Why You Should Consider Installing a Dual-Flush Toliet

American homes are notorious for wasting water. It seems not much thought is given to leaving the water running while brushing your teeth or taking an hour-long shower. Interest in low flow and dual flush toilets is on the rise in the United States, due in part to increased government regulation and the rising cost of water, and there are incentives for making changes in the way we use the toilet. One product set to combat this is the dual-flush toilet. These designs look and act like standard toilets but are able to reduce water consumption by providing the right amount of water for the specific task.

How they work

Standard toilets use siphoning action, a method that employs a siphoning tube, to evacuate waste. A high volume of water entering the toilet bowl when the toilet’s flushed fills the siphon tube and pulls the waste and water down the drain. When air enters the tube, the siphoning action stops. Dual flush toilets employ a larger trapway (the hole at the bottom of the bowl) and a wash-down flushing design that pushes waste down the drain. Because there’s no siphoning action involved, the system needs less water per flush, and the larger diameter trapway makes it easy for waste to exit the bowl. Combined with the savings from using only half-flushes for liquid waste, the dual flush toilet design can save up to 68 percent more water than a conventional low flow toilet [source: How Stuff Works].

Here are a few Pros and Cons for purchasing a duel-flush toilet for your home.

Pros

  • According to the Environmental Protection Agency, 4,000 gallons of water can be saved annually in a residential household that converts to these water-conserving fixtures.
  • Most types of dual flush toilet are designed to use gravity to remove waste through a large trapway, rather than old-fashioned pressure siphoning. The size of the trapway has a bonus effect: it reduces the incidence of clogs.
  • Dual flush toilets aren’t just clever and pretty; those that are high efficiency models are required to flush up to 350 grams of waste.

Cons

  • Some models of dual flush toilets may require professional installation or simply present a frustrating challenge for the DIY enthusiast
  • Many models may leave some residue in the bowl when using the low volume flush option. This means that dual flush toilets in general require more frequent cleaning
Categories
Featured Green Building Home Design Home Improvement

Is Your Water Heater Draining Your Wallet?

Many people are surprised to learn that heating domestic water is the third largest energy expense consumed in households. Therefore using a more eco-friendly water heater will help your family to not only save on energy consumption, which in the long run is great for the environment, but also will help you save your family money.

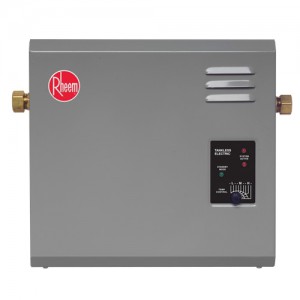
Rheem Tankless Water Heater, Model# RTE-27, $740.55

Traditional tank water heaters continuously heat the water they hold, 24 hours every day, whether you need hot water or not. This is a complete waste of energy and money. However, tankless water heaters provide a much more efficient option by heating water only as it is needed. The water is heated quickly and delivered at a steady rate for as long as it is needed, and the heater shuts off automatically when the supply is closed.

Tankless water heaters are also extremely compact when compared to tank heaters, as they can be wall-mounted whereas tanks can require up to 16 square feet of floor space. A variety of different sizes and types of tankless water heaters are currently available on the market.  It is essential to find one that will be able

to withstand your home’s demands, depending on the size of your home and family. “Whole House” types are available, or you can install two or more separate units to handle different appliances if necessary. Don’t forget to look for the Energy Star efficiency logo when shopping for the perfect tankless water heater for you and your family.

The initial investment for a tankless water heater might be a little bit more expensive than traditional water heaters, however it will save you plenty of money in the long run. Tankless water heaters can cost anywhere from $600 to $1,150 which seems a little steep when compared with $300 to $480 for the regular storage-tank types. Although the cost may seem a little high, we think that it is a great investment that will help reduce your carbon footprint and save you money in the long run!

Sources: Consumerreports.com, (http://www.consumerreports.org/cro/appliances/heating-cooling-and-air/water-heaters/tankless-water-heaters/overview/tankless-water-heaters-ov.htm)